Showing posts with label Installing Ubuntu on Your Motorola Xoom Tablet. Show all posts

Sunday, October 16, 2011

Android News | A Story About Li-Ion Batteries


So after noticing how much of a difference people get in their battery lives, I've decided to do some research and make a guide-line that will give us all we need to know about properly using our batteries. First part is a general information and usage techniques for LIBs, second part is taken from Google materials on Android-powered devices (G1, Magic, Droid, Nexus One, etc).

General Lithium-Ion Battery (LIB) Usage:

• Discharging your LIB fully (or less than 2.4 Volt per cell) is bad for the battery.Every time you do that, it can be said that small part of your battery (some cells) dies (they forever lose their charge). Do not store your batteries depleted, there's a high chance they will die completely or will become very "weak".
• You cannot restore bad LIBs by overloading/heating/praying. You gotta go buy a new one. They DO degrade overtime, some cells naturally lose the ability to gain/give electricity.
• Although it is said that LIBs do not have memory, it's not entirely true. LIBs have gauges that monitor performance of cells, and if you do a lot of small charges, it won't let those gauges to monitor a full battery potential, causing an invalid indication of charge level. A complete charge/discharge should be made when battery capacity seems reduced, that will calibrate gauges and they will provide your phone with correct charge level status. A full charge/discharge cycle should be done every 30 (or so) partial charges.
• LIBs have a shelf-life. Do not buy them to store them. Use them early, use them often, they will die whether you use them or not. Do not buy LIBs to use them in 6 months/year/etc, buy them right before actually using them.

• LIBs have short lives (in comparison to NiCa batteries, etc). You should expect to buy a new battery in 2-3 years after being manufactured. It is caused by internal oxidation and there's nothing you can do to stop or prevent that.
• Worst LIB treatment is to keep it at 100% charge level at high temperature (think laptop/phone under direct sunlight, like car dashboard).
• Best LIB treatment, or LIBs "favorite" charge level - 40%. That's also the usual charge level you buy them with.
• LIBs don't like heat. For example, while always at 100%, typical LIB in a laptop, at temperatures of 25C (77F) will lose 20% (twenty percent!) of full capacity per year. That capacity loss is reduced to 6% (six percent) at 0C (32F), and increased to 35% loss at 40C (104F). So, keep them cool (LIBs like fridges), don't let your devices sit in the sun or overheat at charge. Also, keep in mind that while in use, battery will be significantly hotter than phone/outside environment
• LIBs like frequent partial charges/discharges more than they like full charges/discharges.

• Car "fast-chargers" overtime degrade your battery a little, as they give too much energy to the battery too fast (high voltage). Trickle-charge (USB) is best. They do provide an initial higher capacity charge (high-voltage), but do degrade the long-term battery capacity. General idea is that the slower the charge - the longer (long-term) battery will serve you.
HTC/Google-specific advice:

• Although this part is somewhat controversial, they do recommend having a complete, full FIRST charge to be made. If time allows, a preferred time for the first charge is 12 hours. This may have more to do with the OS than the battery.
• Battery on a Android device, in average, will last about a full day with normal use (some videos, mail, calls). That's what you should kind-of expect.
• Speaking in averages, "idling" 3G/EDGE connection (when phone is sleeping and no data is transferred through 3G), drains almost no energy. Just a little more than having 3G/EDGE radio off completely. So when no apps are using 3G, you don't need to keep it off.
• Same goes to WiFi connection - although it's on, if there is no data flowing through it, it uses almost no energy.
• At full throughput (100% data flow), EDGE is using significantly more energy than 3G. 3G is much more energy-efficient than EDGE.
• WiFi is using more energy than 3G (when both are at 100% use), but since it transfers files much faster and then goes to "sleep", it's actually recommended to use WiFi whenever possible. Since it'll "sleep" more often than 3G, overall it will use much less battery than using 3G.
• Some bad apps or widgets can use android's "WakeLock", keeping CPU at 100%, screen always-on, or both. I myself have encountered such widget (I won't mention the name, it's in the market) that used a WakeLock to keep CPU spun-up at 100% all the time. That makes a huge impact on battery life. My advice - use a CPU profiling app to monitor the CPU - make sure that CPU slows down by itself when it's not used. So, beware of such widgets/apps. To check for CPU cycles, many recommend OSMonitor (free from market, install it, go to options, sort by "Load" in descending order. It'll give you "busiest" processes at the top). At rest you should be getting about 10-20% for OSMonitor itself, and 1-10% Android System. At rest, everything else should be 0-1%.
• Android (at least on Nexus One) slows down CPU when not in use by itself, as a built-in feature. Apps that throttle/change CPU frequency, are not necessarily needed.
Sources:
Wikipedia - http://en.wikipedia.org/wiki/Lithium-ion_battery
BatteryUniversity - http://www.batteryuniversity.com/parttwo-34.htm
Google IO Conference 2009 - http://www.youtube.com/watch?v=OUemfrKe65c
Electropaedia - http://www.mpoweruk.com/life.htm

Thursday, October 13, 2011

Installing Ubuntu on Your Motorola Xoom Tablet


UPDATE 4/10/11: Now you can enlarge your Xoombuntu install! http://trsohmers.com/2011/04/10/how-to-expand-xoombuntu-disk/UPDATE 4/2/11: Here’s the fix! http://trsohmers.com/2011/04/02/ubuntu-for-xoom-fix/
UPDATE 3/20/11: OK, so there are a couple of modified steps to make the system a bit faster, and to be releasing a small path tonight to fix some issues people have been having with the install.
This is simplified instructions for unlocking the bootloader and rooting the Motorola Xoom on Mac OS X, and today I have full instructions on how to install and run Ubuntu on your Motorola Xoom tablet. The method this uses is to install Ubuntu in a chroot“jail” to keep it separate of all Android processes… similar to how a Virtual Machine (Virtualbox, Parallels, VMware) runs an x86 operating system (Windows, OSX, Linux) on an x86/x64 machine. Since the Xoom and most Android devices run on an ARM processor,  you can only run an operating system made for ARM, so I am using the ARM version of Ubuntu version 9.10.

INSTRUCTIONS

NOTE: Even though this is running in a chroot jail, and I am 99.9% sure this will not cause any harm to your device, I can not be held responsible for anything that may happen to your device. Just by rooting and unlocking your device (which you have to have done already to do this) COULD void your warranty and/or brick your device. Then again, you COULD be struck by lightning 42 times the next time you walk outside your house… it is highly improbable unless you go outside in a thunderstorm with a lightning rod.
NOTE 2: The install files for this are about 660mb zipped, and once expanded the files are about 2.5gb.
STEP ONE: Setting up your enviornment
NOTE: I will be writing this from the viewpoint of a Linux/Mac user. If you are running Windows, just remove the ‘./’ from the commands.
NOTE 2: My Android SDK folder is /AndroidSDK/… please insert whatever the name of yours is.
1. I am assuming you have the Android SDK from when you rooted… if you do not, download it.
2. Please download this zip… this is the 660mb one, so it may take a while. Get your favorite drink, have a snack, and if you want you can skim through the rest of this  while it is downloading.
3.OK, now that you have the ubuntu.zip file, extract it to AndroidSDK/tools/
4.Take the busybox and installbusybox.sh files and copy/move them to the root of the sdcard on your device… you can do that manually by plugging your xoom into your computer and browsing the directories (on the Mac you have to use the Android File Transfer application provided by Motorola).The other way is to use ADB push, and that is what I will explain.
(Make sure you have USB debugging enabled in Settings > Applications > Development)
4a.Open up your terminal application, and change the directory to your AndroidSDK/tools
4b.Type in ./adb push busybox /sdcard (It should tell you when it has done transferring)
4c.Type in ./adb push installbusybox.sh /sdcard (It should tell you when it has done transferring)
4d.Type in ./adb shell (This allows you to access the terminal on the device itself)
4e.Type in su (This gives the terminal Super User privileges. If you get the error “Permission Denied”, you have not rooted your device)
4f.Type in cd /sdcard (Changes the directory to the device’s sdcard. NOTE: The Xoom doesn’t really have an sdcard at release… but Motorola seems to have made a virtual one so devices that require an sdcard still run.)
4g.Type in sh installbusybox.sh
After that is complete, busybox should be installed. Try entering a command like cp and see if it displays anything. If not, reboot the device (./adb reboot) and try the cp again.
5. Now that busybox is installed, lets get to actually installing Ubuntu. You now have to move all the files in the Ubuntu folder (minus busybox and installbusybox.sh) to /sdcard/ubuntu …. you can do this using a method other than ADB push, but I will explain it the ADB push way.
5a.Type in ./adb push fsrw /sdcard/ubuntu (It should tell you when it has done transferring)
5b.Type in ./adb push mountonly /sdcard/ubuntu (It should tell you when it has done transferring)
5c.Type in ./adb push ubuntu.sh /sdcard/ubuntu (It should tell you when it has done transferring)
5d.Type in ./adb push ubuntu.img /sdcard/ubuntu (It should tell you when it has done transferring)
NOTE: This file is over 2gb’s! It will take a while to transfer, and on average it takes 25-30 minutes. Time for another snack break.
5e.Type in ./adb push unionfs /sdcard/ubuntu (It should tell you when it has done transferring)
STEP TWO: Installing Ubuntu
6. OK, lets get this installing. You are going to be going to be going into the shell again, so follow these commands:
6a.Type in ./adb shell (This allows you to access the terminal on the device itself)
6b.Type in su
6c.Type in cd /sdcard/ubuntu
6d.Type in sh ./ubuntu.sh
It will give some errors, but as long as it gets to “To enter the Debian Linux Console type in ‘bootubuntu’”, you should be good. Congratulations, Ubuntu is now installed.
7. OK, now that Ubuntu is installed… you want to turn it on, right? now Type In: bootubuntu and you should give you a new line saying “root@localhost:/” Congratulations, Ubuntu is now running. If it is not running, try to Type in su bootubuntu and thenbootubuntu again. If that does not work, try rebooting your device and do it again… if it is still not working, try going through steps 5-7 again. If you have any more issues, feel free to comment here and I will try to help you.
STEP THREE: Setting up Ubuntu
8. You should still be in the shell and at the root@localhost entry. You are now entering commands through your terminal, into Android’s terminal, which is entering into Ubuntu’s terminal (What is this, Inception?). Like all operating systems, you need to update them… but with Ubuntu, this is quite easy.
8a.Type in apt-get update
8b.Now we are going to add a “head” to this “headless” OS. Since Android is the main operating system on here and Ubuntu has nothing to display on, we are going to output X windows (The GUI Linux OSs) to VNC. Type in apt-get install tightvncserver
8c.Once tightvncserver is installed, type in apt-get install lxde
8d.Type in export USER=root
8f.Type in vncserver -geometry 1280×800 (Resolution of the Xoom’s display. You can experiment to find a resolution you like.. you can type this command whenever to change the resolution)
8g.It should ask you for a password for your VNC… you can use something simple like 123 since you are the only one who can access it since it is only on your device.
9.Now we are going to change some settings to make the VNC experience better….
9a.Type in cat > /root/.vnc/xstartup
9b.Type in #!/bin/sh
9c.Type in xrdb $HOME/.Xresources
9d.Type inxsetroot -solid grey
9e.Type in icewm &
9f.Type in lxsession
10.Press CNTRL+D, and then enter this…
10a. cat > front
10b. export USER=root
10c. cd /
10d. rm -r -f tmp
10e. mkdir tmp
10f. cd /
10g. vncserver -geometry 1280×800
11.Hit CNTRL+D again, and enter this…
11a. cat front /root/.profile > temp #Thanks David Tangye
11b. cp temp /root/.bashrc
12. Now you can exit out of the Ubuntu terminal by typing exit
13.Reboot your device
13a.Install a VNC app from the market such as this Android VNC (Free)
13b.Install a Terminal Emulator app from the market like this Better Terminal Emulator Pro (3.99) or Android Terminal Emulator (Free)
13c.Now you can use the ADB shell again, but I suggest doing this on the device using one of the Terminal Emulators.
13c.cd /sdcard/ubuntu
13c.su (If the Superuser app asks for permission, press yes)
13c.bootubuntu
13c.OK, you should see the same thing as you did on your computer screen. Now go back to your homescreen, and  open your VNC client.
13d.Now, in the Nickname spot, put ‘Ubuntu’ or whatever you want.
13e.In the password spot, put whatever you put for a password earlier.
13f.Leave the address blank.
13g.Set the port at 5901.
Set the color format to 256 colors (1 bpp) for the best results.Then you press the Connect button, and you are on Ubuntu!
14. Some information:
1.Tap to click, pretty simple.
2.Double tap for right click.
3.You can switch in and out of ubuntu… just click your home button or the task manager button.
4.You should be automatically connected to the internet since it shares the device’s internet connection. So this will work on 3G, 4G, Wifi, or not having any connection. I am also going to see if I can transfer files between Android and Ubuntu since they should be on the same ‘network’.
That about wraps it up! Hope you will enjoy Ubuntu on your Xoom!

Read the original article here!

Dual-boot Ubuntu 10.10 And Windows 7 Side By Side


Dual booting Ubuntu 10.10 Maverick Meerkat and Windows 7 is fairly easy. If you don't believe me, just read on!

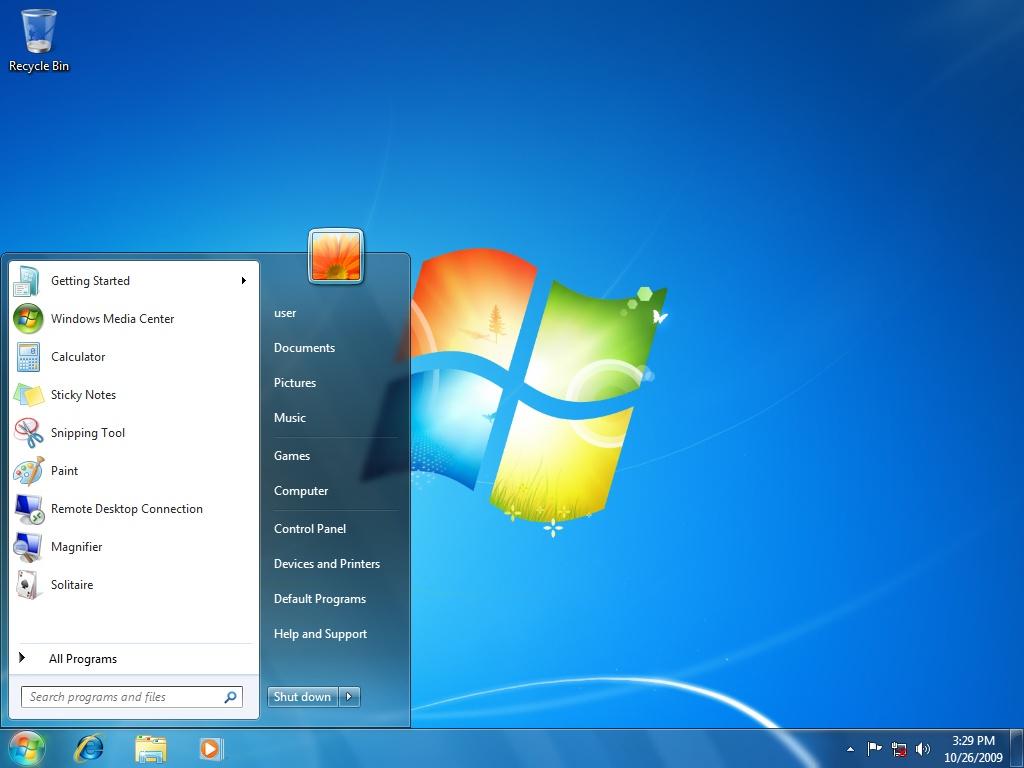
Step 1 Get Windows 7

How To Dual-boot Ubuntu 10.10 And Windows 7 Side By SideFirst thing's first! Ye can't install Windows 7 without an installation disk, can ya? So if your PC did not come with Windows 7 pre-installed, grab a disk here from Microsoft.com. Remember, it burns holes in your pocket.

Step 2 Get Ubuntu 10.10

How To Dual-boot Ubuntu 10.10 And Windows 7 Side By SideNow the fun part begins. You download a complete operating system from a legitimate site, yet you don't pay for it. Because it's FREE (as in beer, ;-) ). Get a copy of the Ubuntu ISO image here. Or if you prefer, download Ubuntu via BitTorrent. BitTorrent is my preferred method because downloads are hash checked automatically. So they are never corrupted.
Step 3 Prepare Windows

How To Dual-boot Ubuntu 10.10 And Windows 7 Side By SideIf you have Windows 7 pre-installed, you don't need this step. There is a good HowTo on installing windows right inside Microsoft's site. Here's a link.

Step 4 Prepare Ubuntu

I assume you have a fully working Windows 7 right now. Follow this steps to install Ubuntu:-
    1. Make sure you have at least one partition empty on your hard drive. This is where you are going to put Ubuntu. It is desirable to have more than 2GB of space on this partition.
    2. Burn Ubuntu ISO image to a disk (easier) OR create a bootable USB stick (harder but Unetbootin makes life easy, :) ). From here on I'll assume you have burnt a disk. Alternatively, see the end of this article for a small HowTo on Unetbootin.
    3. Enter your BIOS settings page and make sure you have your CD-DVD ROM listed as your first boot device. Save settings and exit.

  1. Put the Ubuntu disk in tray and restart your PC. You'll see Ubuntu running directly from the disk. You need not worry at this point. Since no changes are made to your PC.
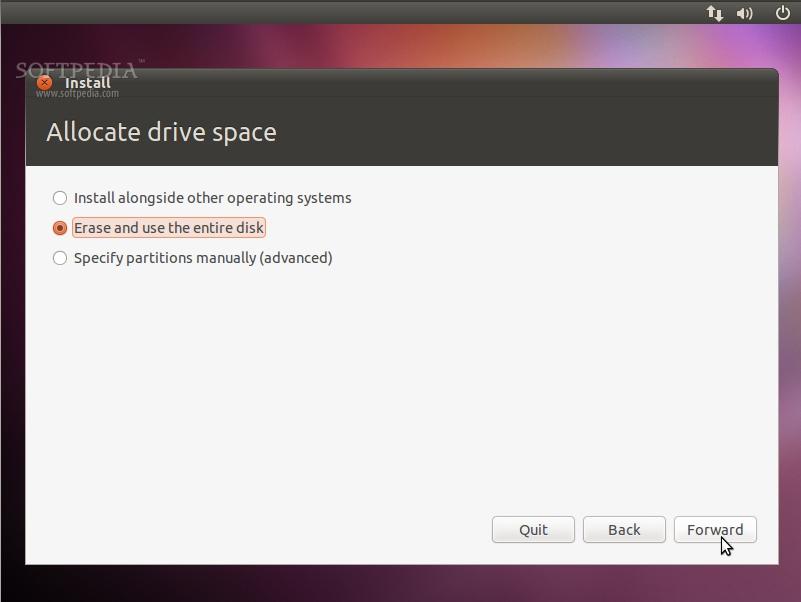
  2. How To Dual-boot Ubuntu 10.10 And Windows 7 Side By SideClick on Install Ubuntu and follow on screen instructions until you reach theAllocate Drive Space dialogue. Take a deep breath here.

Step 5 The Tricky Part

Please read the Warnings section first!
Now follow the screenshots carefully:-
  • Select Specify Partitions Manually (advanced).How To Dual-boot Ubuntu 10.10 And Windows 7 Side By Side
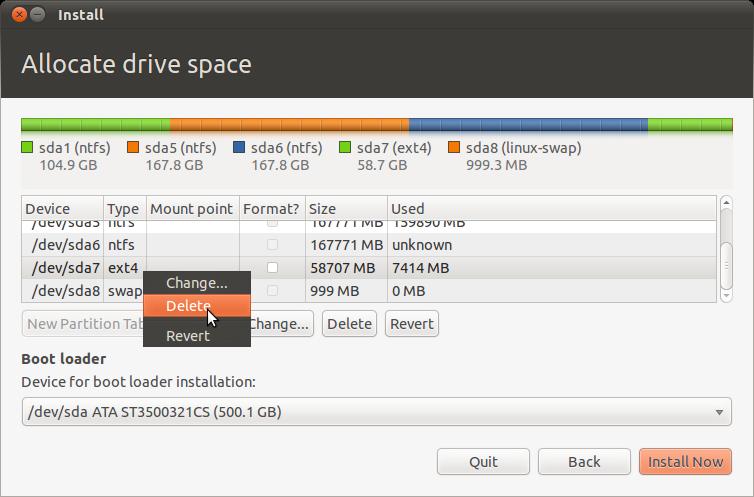
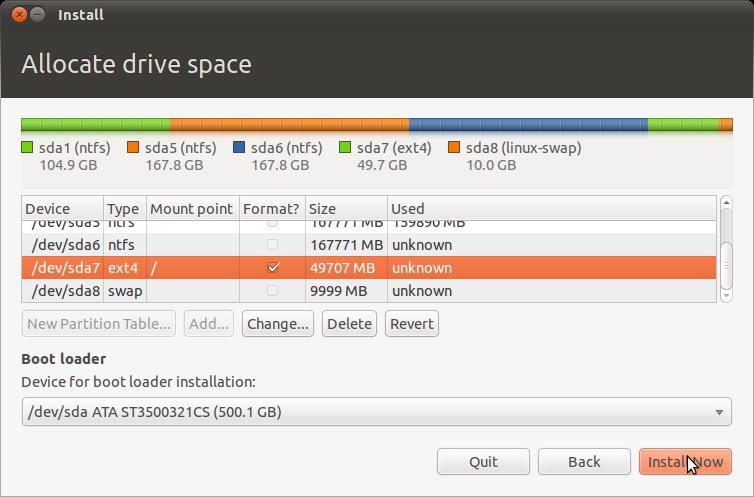
  • Delete the partition that is Already Empty! Here /dev/sda7 is the partition I am deleting. This step might be confusing for beginners. Just make sure you remember the size of the empty partition you prepared. I had a 60GB partition, so I am deleting that one. Please don't delete anything unless you are 100% sure. Leave your Windows partition as it is.How To Dual-boot Ubuntu 10.10 And Windows 7 Side By Side
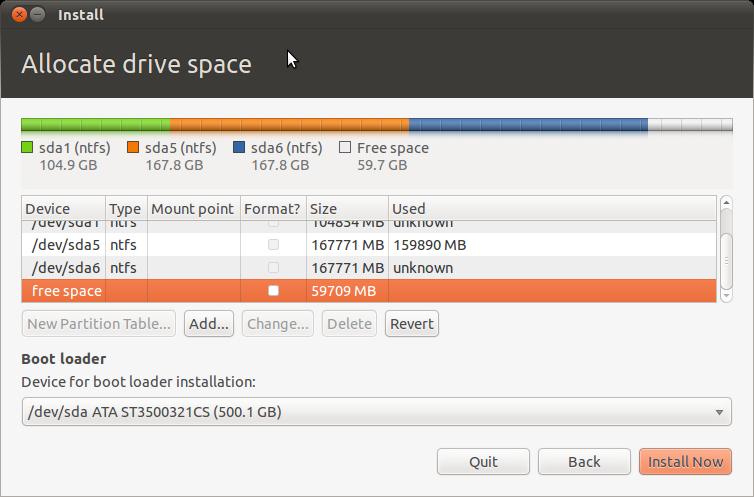
  • At this point you'll see some free space.How To Dual-boot Ubuntu 10.10 And Windows 7 Side By Side
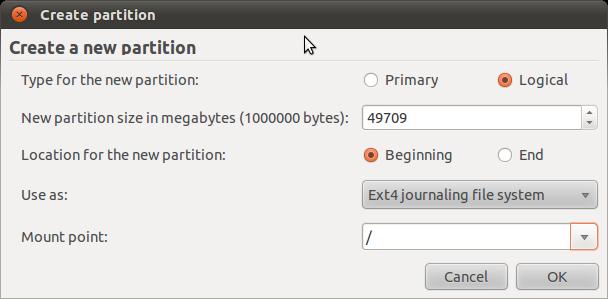
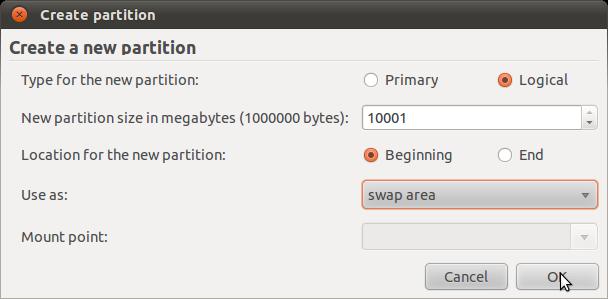
  • Click Add while free space is selected. It will show the Create A Partition dialogue. Make sure you leave some space for swap area here. I left 1GB. So, instead of creating a partion of size 59709 MB, I set the size to 49709 GB.How To Dual-boot Ubuntu 10.10 And Windows 7 Side By Side
  • Now you'll have an Ext4 Partition AND some free space. Select free space and click Add (again!).How To Dual-boot Ubuntu 10.10 And Windows 7 Side By Side
  • This is what your partition table should look like. At this stage you should have one Ext4 and one swap partition. Click Install Now.How To Dual-boot Ubuntu 10.10 And Windows 7 Side By Side
  • The rest part should be fairly easy. You've passed the toughest hurdle.

Warnings

  • Please be careful with the previous steps. I am going to partition the hard disk manually. A mistake here can destroy valuable data saved in your hard disk.
  • Also, it is assumed that you have at least one empty partition with more than 2GB of space ready. We are going to reformat that partition. And unless you install something similar to Ext2IFS under Windows, you will not be able to see the partition from within Windows. This is normal.

Step 6 Booting Ubuntu From USB Sticks. Unetbootin Saves The Day!

Here's a good HowTo on Unetbootin. Please ask me if you have troubles following it. It is verrry simple, trust me.